
At the Empire, we love to see how you do all the amazing things you do. Reader DIY submissions show us so much! We can all learn to cook vegan bacon cheeseburgers, turn coffee tables into chalkboard canvases, and make our own wax seals from buttons. Our DIY archives have a big bright rainbow of how-to-DIY posts, but many of us are hungry, like some kind of craft-zombies, for MOAR BRAINS… err…. MOAR DIYs!
Here’s the trick: sometimes we need just a bit of help teaching each other how to do the awesome things we do ourselves. Framing the steps into a process we can repeat with huge success is easy if we all put our teacher hats on. Here’s a great outline for teaching us all how to be YOUR kind of awesome – how to write a DIY tutorial.
1. Give a specific title
I seriously heart a cute-but-mysterious title, but no one will know what I am talking about until they read the post — which is not so helpful. Naming your tutorial with a “How to….” lets people know they’re about to dive into a DIY post, and what they’ll be making.
How to boil water instead of The Un-Watched Pot
Optional work-around: Give a cute title but with a specific subtitle.
The Un-Watched Pot: How to boil water
This weekend I’ve been chewing over issues of literature and the literary life as compared to the work and life of commercial writer. I’ve paid... Read more
Bonus: titling your tutorial this way will make it easier for people to search for it later. Cue the “ohhh… I wanna look up that one about making mints that look like matchbooks!”
2. Begin with a picture of the completed project
Up top — right at the beginning — so all of us can see what we are going to make. This is your awesome final product. Feel free to style it up like a Ruchebag. Good light (natural light, if you can!) and a clean photo = happy times.
Tip: Take a few photos of the end project so you can pick your favorite ultimate photo. Also, if it’s something that gets used/worn/otherwise verbed – show it in mid-verb. In other words, if your backpack’s got jets, show it in flight!
3. Give an overall introduction and description of the project
Why would another Bride, Homie, Families member want to do this, too? Give it some context. How do you use it? How long did it take to make (a few commercial breaks, a few episodes of Mad Men on Netflix? hours, minutes, days)? What is it awesome for (gifts, recycling, eating leftovers, decorating a rental kitchen, just plain fun, etc.)? Do you recommend an age range (adults, kids with adult help, 3+, etc.)? Then tell us about the difficulty level (for total beginners? for intermediate bakers? For advanced practitioners of awesome?) and you’ve got a good introduction to your project.
The lore of cookery says a watched pot never boils. What’s behind the magic of the un-watched pot? Boiling water is good for so many things – making hot cocoa, sterilizing jars for making jam, unclogging a stuck drain, or just cooking spaghetti. It usually takes just a few minutes over high heat, and is easy enough for anyone to learn. So here’s how to trust the magic of thermodynamics and boil some high-quality H20.
4. Materials and tools list
Make a list of every single thing you will need to complete the project. Be thorough. If you need a pencil and an eraser, write down both – it may seem like overkill, but don’t assume my pencil has an eraser!
Note any tips about special tools or materials — if you use a particular brand (particularly because your trial and error has determined that brand is the best for your project) jot that down and a note about why. Let us know if this project is messy, if it should be done outside/needs ventilation, that kind of thing.
Also, do you know what makes a materials and tools list even better? A picture of the whole pile of materials and tools.
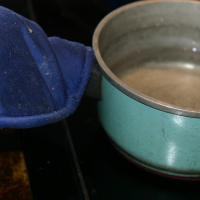
Materials and Tools:A pot or pan
Water (tap water is great, bottled water works, too)
Heating element (a stovetop works best for this project, a microwave or coffeemaker will do in a pinch)
Potholders
Optional: Measuring cup
Special Note Regarding Pictures: The more pictures in your tutorial, the better. To help people learn how to do your project at each step, you need to have at least one photo to illustrate each different step.
You don’t have to be a professional photographer to take great DIY tutorial photos. Try to take photos in daylight/with natural lighting. Keep your background and workspace clear. Take a few photos of each step, in case one is blurry.
You can use free products like Picasa to collage multiple shots or add notes or arrows to point out specifics.
5. Procedure
This is admittedly, the hard part. When you’re teaching someone how to do your awesome project, you have to take a step back and try to see it as if you’ve never done this before. Break it down into lots of clear easy steps. “Too many small steps” is a totally cool approach.
Number your steps and use bold and italic for important tips. Definitely add any precautions or pointers or “don’t do what I did” kind of help.
Watch your vocabulary and try to be consistent with the words you use. This is the Offbeat Empire, so by watch your vocabulary I don’t mean you can’t call something fucking beautiful. I mean if you call it a pot in step 1, don’t call it a pan in step 2 or you run the risk of confusing your earnest readers.
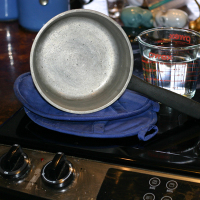
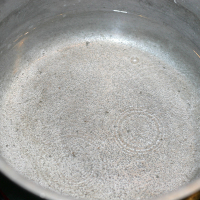
Step 1: Pour water into your pot or pan. The amount will vary depending on your use, but make sure your pot or pan is not more than about ¾ full, or you risk boiling over. You can do this straight from the tap into the pot for less precise measurements, or you can measure the water first, in a measuring cup, before pouring the specific amount into your pot.
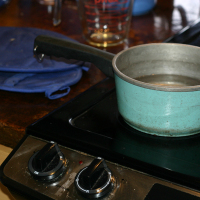
Step 2: Center the pot over the heating element. On our stovetop, this front burner is the perfect size for this pot.
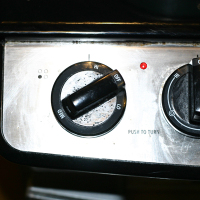
Step 3: Turn on the heating element to “high” – this may be listed slightly differently on your heating element – hotter element boils water faster. Physics!
Step 4: Allow the heat to transfer from the element through your pot to the water. This can take a few minutes. While it’s happening, your pot is getting very hot, so use potholders and caution when handling!
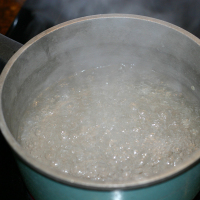
Step 5: When you start to see small bubbles forming on the bottom and sides of the pot, you’re almost there. This is technically “boiling water” though most recipes call for a “rolling boil” so hang tight just a bit longer!
Step 6: When you see large bubbles rushing to the top of the pot and bursting over each other, you’ve achieved “rolling boil” – Congratulations!

6. Applications
Go over some of the ways your project can be used by other Offbeat Brides/Homies/Families. Not just the one you’re highlighting, but other ways to apply this new skill.
Boiling water is great for cooking pasta – add a little salt to the water while it’s boiling for flavorful pasta. Boiling water is also good for hot beverages, like teas, coffees, and hot cocoas. You can boil water and add spices that will make your whole house smell good. You can also pour it into hot water bottles, designed to turn boiling water into comfortably warming toes.
Boiling is a technique that works with lots of liquids, too. You can boil chicken stock, tomato soup, or even pudding!
7. Tips
Here’s where your expert teacher mode comes in. Is there a bit that might throw a beginner for a loop? Remind them here. Did you learn along the way that something works better than another thing? Juicy tips help us learn from your experiences.
Remember any bubbles = boiling. You can cook pasta, rice, hot dogs and eggs in not-so-rolling-boil. Read your recipe directions for specifics, but if it doesn’t say “rolling boil” you can toss it in at the first sign of bubbles.
If you don’t have a stovetop, you can boil water in the microwave! Make sure you use a non-metal container (metal will spark and catch fire in a microwave!) and be sure to use potholders when handling – the container will get hot, too! Microwaves tend to boil water like so: 1 cup of water takes 1 minute on high heat.
Boiling water is super hot. It can scald your skin. If you get that burning sensation, run cool tap water over the affected area for a few minutes to avoid blistering.
Conventional wisdom says to always start with cold tap water, rather than hot. Did you know this has nothing to do with the thermodynamics of water? It’s because cold tap water is less likely to pick up particles of the metal in your pipes as it comes out of the tap, putting fewer accidental minerals in your food as you cook it. Science! So starting with cold tap water is a good idea, but in a pinch, warmer tap water is totally ok – you’re not doing it wrong that way!
7. Bonus Tips!
- Write it first. I like to write the whole thing out before I start the project I’m taking pictures of for a couple reasons. First, it helps me make sure I’m logically explaining all the steps involved, and breaking it down into all the baby steps I can. Second, it helps me identify which pictures I need to stop to take to illustrate the process. Third, by the time I’m done taking those pictures, that’s all I have left to do – illustrate the completed tutorial and submit! This process of write it-do it-submit it is one that takes the pressure off of “oh, now I have to write the whole thing up!” which, for me, can lead to well-intentioned procrastination. So I highly recommend writing first.
- Check for errors. Read your awesome tutorial through several times to make sure it makes sense and that the steps are all in order. If possible, have someone else read it, too. Bonus if you find someone who has no idea how you do your awesome and can say at the end, “Holy crap, I can totally do your awesome!”
8. Your Turn!
At the end of your DIY tutorial of awesome, it’s always good to pull it together for other Offbeat Brides/Homies/Families…. Ask us how we’ll do your awesome and make it our own, and invite us to share our versions in the comments below and on Flickr.
So, dear Offbeat Brides, Homies, and Families, how will you share your awesome with the rest of us? I hope you’ll write up some fabulous DIY tutorials to teach us all how to be AWESOME. Tell us what we have to look forward to from you in the comments below, and get to submitting!!! We want to feature YOU!
Ready to get submitting?
Offbeat Bride: http://offbeatbride.com/submissions
Offbeat Home & Life: http://offbeathome.com/submissions
Offbeat Families: http://offbeatfamilies.com/submissions
“it may seem like overkill, but don’t assume my pencil has an eraser!”
Oh the humor! You slay me!
I’ve actually been wanting to post some recipes and this is really helpful 🙂
You guys are made of awesomeness!
Laugh if you will, but I had to explain to my otherwise-very-intelligent husband that when you want to boil water, you should turn it up to high heat and not to medium.
So this post is encouraging us to DIY us some DIY tutorials — by giving us a tutorial on how to do them ourselves. That is awesome.
DIY INCEPTION!
…it’s tutorials all the way down.
meta-DIY!
My other half just told me I should read this carefully, I’m not the best cook on the planet… a few burnt kitchens and one curry that made places of the body bleed attest to this fact.
I’m assuming the boiling water example wasn’t really meant in earnest, but I will add a word of caution to your tip about the microwave anyway! Unless you know your microwave and container really well and have been fine in the past, microwaving water has the potential to be dangerous. What makes bubbles form is actually tiny defects in the holding container [citation needed]. If your container is too smooth and/or clean, bubbles don’t have a place to form and the water can become super-heated. Then, when you take it out and disturb it, like with a spoon, it can all erupt at once and scald you. You can introduce defects by using a bumpy container, or microwaving with something like a chopstick in the water (as long as it’s not metal). But to be on the safer side, it’s better to boil water over a stove.